My Oil Painting Palette 31x20x3 inches made by http://windbergartcenter.com/shop/art-supplies/wood-box-glass-palette/
 Next to my Palette is my metal tray with safflower oil where I keep my brushes.


Then I use rubbing alcohol and palette knife and towels to finish cleaning my Glass 🎨 Palette.


I keep my Wet Oil Paintings inside of a cardboard 📦 boxes to keep the dirt off


OIL PAINT MEDIUMS:
I find that it's best to start with pure OMS gamsol made by gamblin or any odorless artist quality thinner, I recommend if you do have enough ventilation try Winsor Newton turpentine it's the best to Begin for the first 2 layers, then move onto 3 parts Gamsol OMS + 1 part stand oil, gradually increase it after the first 5 layers move to 1 part OMS + 1 part stand oil, and the very last layer you can use pure stand oil plus paint
this is the Air Filter I use, it's great!
In addition you can also consider using maroger or amber painting mediums I have included some links:
Here's some sites I highly recommend, books and videos, and painting the head in oil by john howard sanden, how to paint like the old masters by joseph sheppard, creative illustration by andrew loomis,drawing the head by a loomis, Mark Carder's website, he's a true master drawmixpaint
this website offers old masters mediums oldmastersmaroger the italian medium has wax, amazing stuff, www.ambervarnish.com www.danielgreeneartist.com daviddavisnyc.stores.yahoo.net/ oil-painting-mediums-mediums.html http://www.williamsburgoilpaint.bizland.com/Mediums/oils.htm oil of bernard video. You can also use winsor newton original liquin, and/or mix it with either linseed oil , half and half, and winsor newton fine detail gel.
OIL PAINTS
I highly ecommend artist grade Oil paints, and not student grade paints if you can, I like Windsor Newton, Gamblin, Holbein and Mark Carder's Oil Paints , the Geneva Oil Paints made by Mark Carder are non toxic, you don't need to add any painting medium to the paints, and they dry a little slower, which is perfect for artists that like to work wet in wet, and need more open time🙏 and of course you can use any oil paints that you have. I suggest these basic colors: Titanium white, Burnt Umber, Bismuth Yellow, French Ultramarine Blue, Pyrrole Rubin, from these colors you can mix any secondary color or grays.

Oil of Lavender Spike, known as spike oil, is an essential oil that has been documented to have been used as a solvent for oil painting since the Renaissance. Painters such as Da Vinci, Rubens, Van Dyck, and others have been recorded using spike oil.
Its particular virtue for contemporary artists is that, unlike Turpentine or Odorless Petroleum Mineral Spirits, it is considered less-toxic, non-carcinogenic, without a record of chronic health risks, and still functions as an exceptional solvent for oil painting. It is the best alternative to turpentine and odorless petroleum mineral spirits on the market and, like other oil painting solvents, spike oil can thin and mix with paints and mediums as well as fully dissolve resins to make varnishes. Besides its use in oil painting, it is also used in perfumes, soaps, aromatherapy and for other holistic practices.
Regarding the use of solvents in painting, artists must be aware that due to the high concentration and quantity used, even solvents with health benefits and lowered toxicity risks should be handled carefully. For example, people who have allergies to lavender or flowers, or are sensitive to strong smells should use caution while working with spike oil, painting solvents, and essential oils in general. In practice, people should always use adequate ventilation and common sense when using any painting solvents.
Oil painting solvents are all essential oils, e.g. volatile oils that evaporate. Essential oils, including lavender oils (there are dozens of species used commercially) are produced for many industries: perfumes, vitamins, cosmetics, food, aromatherapy, as well as for the art materials industry.
CCS Lavender Spike Oil Essence™ like most, if not all, varieties of spike oil sold in fine art (i.e. perfume, vitamin, food, and cosmetic industries) is not 100% distilled Lavender latifolia flowers but is made from distilled lavenders, plants, flowers and other natural sources. The essential oils distilled from these natural sources are then composed into the same chemical composition of oil distilled from Lavender latifoli

Sennelier Green for Oil Thinner is a safer, eco-friendly alternative to traditional solvents. Use Green for Oil Thinner just like a classic thinner. Mix it with your oil paints to make them more fluid and more suitable for underpainting. Made from renewable raw materials, this bio-solvents is 100% safe. It's easier on your studio, too. Green for Oil Thinner doesn't require special ventilation or storage. And it's biodegradable. Traveling artists will appreciate being able to carry Green for Oil on planes. It's not restricted like other products.
Air Filter I have included a photo of my air filter, its the best one I've found, I highly recommend it, in addition to also have an open window if you can, this filter is perfect for those that don't have enough ventilation, photo below.


OILING OUT And the importance of it, for working in layers with Oils It's essential to do it, I use gamsol oms mixed with either sun thickened linseed Oil or stand oil for Oiling Out the surface, it helps to paint wet into wet, simply add oms+stand oil on a clean rag, and circular motions, rub it on the surface, it is always necessary to oil out with oil painting, also in order to bring back the darks, the color and the values... Before oiling out rub the surface gently with a white paper towel if any paint picks up, it is not dry yet
🎨 How to Prime and Seal Wooden Panels, Canvases.
To paint with Oils, first clean the wood surface with a damp rag and you can also sand it down then wipe it clean then after that I give it 2 coats of golden GAC 100 to seal the wood , front and back, it's better substitute than rabbit skin glue , and protects from sid discoloration, and then 2 coats of acrylic gesso or oil primer, and it's ready to go. You can get wooden panels at the hardware store.
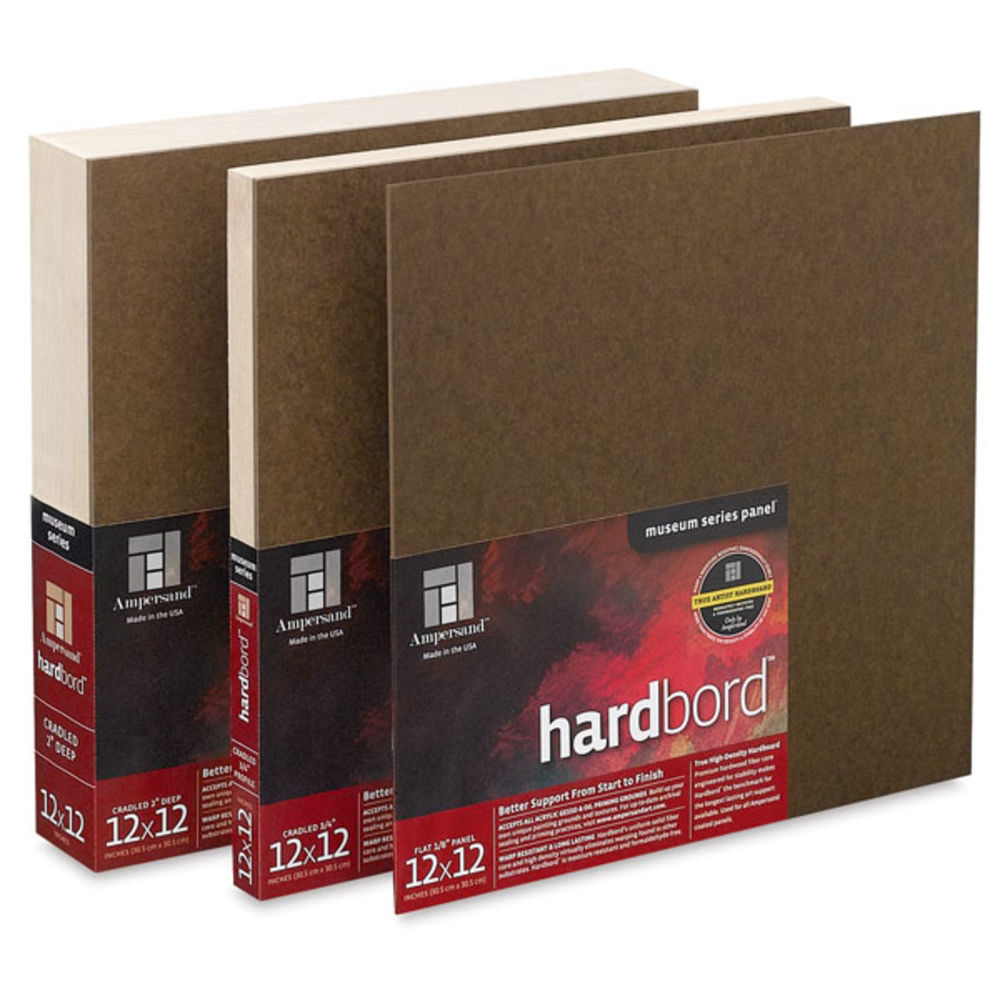
HARDBOARD PANELS or STRETCHED CANVAS ?
For artists seeking stability and longevity in their work, hardboard panels consistently outshine stretched canvas, providing a rigid, durable support that stands the test of time. Unlike the unpredictability of canvas, which can sag or distort, panels offer a consistently flat and resilient surface, allowing for detailed precision. Additionally, for those seeking versatility, canvas can be seamlessly mounted to hardboard, combining the best of both worlds in one masterpiece.
I wanted to dive in a little deeper on the panels side of things. So I'll get into the specific reasons why using hardboard panels should be your preferred choice for small paintings. Additionally, I will share some ways on how you can create your own panels and save money doing it.
So, what is MDF BOARD?
MDF, or Medium-Density Fiberboard, is a widely used wood-based product across many industries. It is made by combining wood fibers with wax and resin under high temperature and pressure. MDF offers a smooth, uniform surface that is not only affordable, but highly versatile. It is commonly used in furniture, cabinetry, and decorative paneling.
What is MASONITE ?
Masonite, sometimes referred to as tempered hardboard, is a type of panel made from wood fibers and resin. It is known for its durability and smooth surface, making it ideal for many applications. With its strong material properties, Masonite offers a reliable solution for various architectural and design needs.
The name "Masonite" comes from the company that first produced this type of hardboard. It was invented and patented by William H. Mason in 1924. The term Masonite eventually became synonymous with the product, and it is now used to refer to similar types of hardboard produced by various manufacturers.
What is the DIFFERENCE between MDF and MASONITE?
Masonite typically has a denser composition compared to MDF, making it a more suitable choice for applications that require higher strength and impact resistance. This is why Masonite is the preferred choice for artwork support.
Superior SUPPORT and DURABILITY
When working on smaller paintings, the stability of the surface is crucial. Hardboard panels and MDF board provide exceptional support that surpasses the flexibility of stretched canvas. Unlike canvas, which can sometimes sag or lose its tension over time, panels remain flat and sturdy, ensuring your artwork stays intact for years to come.
Making small canvases that do not sag or stretch improperly is actually tougher than one might think. I can't tell you how many small-sized stretched canvases I've bought that are not perfectly flat or taut. Many times these were brands of canvas that I've had great luck with in large sizes as well. So when it comes to consistency, you can't beat hardboard panels here.
Smooth and Consistent Texture
This one is sort of a no-brainer. Panels offer a smooth, consistent surface, free from the irregularities and weave patterns found in canvas. This smoothness provides an excellent foundation for creating intricate and detailed artworks. Whether you prefer a smooth finish or want to experiment with texture through impasto techniques, panels offer unparalleled control within your brushwork.
Some artists may not like a perfectly smooth texture and that's understandable. Luckily, there are several ways to prep your boards as well which produce different feeling surfaces to work on which I'll touch on down below.
RESISTANCE to MOISTURE and WARPING
Humidity and moisture can be detrimental to stretched canvas, causing it to warp or even grow mold over time. In contrast, MDF board, ideally when a sealer is added, is more resistant to moisture, making them ideal for environments with fluctuating humidity levels. This quality ensures the longevity of your artwork and allows you to display it confidently in any setting.
Now, size is a bit of a limiting factor here, which I think is important to mention. I've painted on 18x24" hardboard without any reinforcement or backing to it and the moisture of the paint caused it to curl a bit. It wasn't a huge deal as I was able to press it flat into a frame, but this where panels lose their advantage and why I say they are only best for small paintings.
If you are wanting to use HARDBOARD for anything 18x24" and larger, I would highly recommend going with the Cradled Hardbords by Ampersand. These are the same boards, but with a frame on the back similar to a stretched canvas. With the framing, these boards are very resistant to warping and I use them to make my 30x40" canvas panels with great results.
HOW to PREP an UN-PRIMED PANEL
If you are starting out with a raw MDF board or un-primed panel, there are a few ways you can prime your surface for painting. The first option is to get yourself a good fan blender brush and a bottle of quality gesso. Squeeze out a little gesso on the board and proceed to fan it out with the brush until it is smooth. After the first pass it will be a little rough, so wipe off the excess on your brush with a paper towel and continue working the surface. As it begins to dry, you will be able to smooth it out more and more. This process can take 5-10 minutes before you are left with a smooth panel with a bit of canvas-like texture.
The next method is to buy a can of spray primer such as Krylon Gesso Spray. Simply spray on the primer for an amazingly smooth surface with a touch of texture, similar to fine sandpaper.
CREATING YOUR OWN PANELS
There are several ways in which you can make your own panels and I'll cover them briefly here. The first option is to buy panels from your local hardware store. These sheets often come in larger sizes and often times you can have them cut into the sizes you wish or just cut them yourself. Be careful with this method as the acidity of the wood fibers may not be sealed. It's important to coat your panels with something that serves as a barrier between your art and the panel. I use PVA mixed with water, but use precautions so that I do not warp the panels from the moisture.
Honestly though, I think the better option is to buy pre-cut art boards from your favorite art supply store as it saves you time and possible frustration. These boards made specifically for painting also are manufactured with longevity of your art in mind.
So, there you have it. I love using stretched canvas or linen, but anymore these days, I save them for the largest paintings. You wouldn't want to use panel for a huge painting anyways because of various reasons like weight and stability. However, when it comes to that 8x10 or 12x16 that you've been planning, I think you are much better off finding a panel solution that works for your painting style. I hope this helps clear up some things on panels for you and remember that there isn't a perfect solution for everyone's needs, so don't be afraid to try new things.
PAINTING on CANVAS vs PANEL - Which SURFACE GIVES the BEST RESULTS
One of the biggest factors in how well a painting comes out is the surface which you create it on. Throughout the last twenty years I've slowly narrowed down what I prefer to paint on which allows me to produce original artwork that is both visually stunning and stands the tests of time, like this one:
In this post, I'm going to cover what painting surfaces I prefer and some other options that are out there.
There's no one answer for every artist, the surface on which you paint on is largely individual and will always vary even amongst the best painters. So just remember that nothing is right or wrong here, it comes down to your preference and your own unique intentions. Hopefully I can give you some direction however in what might be best to try in your process of discovering what's best for you.
One of the first things to consider when choosing a surface to create your masterpiece on is longevity and archivalness. If you’re wanting to start a profession in art and want your paintings to last decades to come, choosing a surface that will stand the test of time is key. Hardbord is excellent because unlike stretched canvas, it cannot be poked and doesn't flex nearly as much. Over time, stretched canvas can lose its rigidity and become loose on its frame, which can be bad if you are hoping to avoid any type of physical wear or cracking. Hardbord is completely smooth and many love it for it's ability to allow for precise detail. Plain hardbord comes unprimed, so they'll need a layer or two of gesso; Because of that, if you wish to try painting straight on a panel, I would go with a gessobord which comes primed and ready to paint.
One major downside to gessobord, MSD panels, or other hardboards are that the corners are very prone to being dented and damaged if hit and as a result, they can and will chip if you're not careful. Painting on hard panel is still a great option if you find that it works best for you, just keep that in mind and be careful with them. I would highly recommend framing these and never hanging them with exposed corners. If you like painting on panel, but want something more durable and with a bit more texture, I'll talk about that below in a second. First, let's start with texture.

Do you like a lot of texture or none at all? Or somewhere in between? The texture of your surface will determine how paint will transfer from your brush. Little to no texture will not pull paint off of your bristles and well as medium or coarse texture will. This is why many artists do not prefer to paint on smooth board or panels. I'll admit myself, smooth boards can be tricky! That being said, too much texture can take away from what you're trying to achieve. So for me, I like texture to grab the paint, but not too much.
If you want some texture, canvas is the way to go. The great thing about canvas is that you can control how much texture you want. All canvases and brands have varying textures. Some canvases have a deep tooth and some have shallower tooth to them.
You can add layers of gesso and/or paint to smooth out those grooves, leaving just a touch of texture. I like to apply gesso with a joint knife and scrape it across the canvas tooth rather than using a brush which doesn't necessarily help smooth things out. It really takes some experimenting to figure out which you like best. Finding the sweet spot is a personal endeavor and takes patience and time!
I originally thought that stretched canvas was just what I should use, but that changed with time as well. For archival purposes, I didn’t like how stretched canvas can become loose over time. Whenever I visited museums and viewed older paintings, it seemed that the ones done on stretched canvas were always the first to crack and show major signs of wear. At the same time however, I always felt I couldn’t trust a bare panel alone being that the edges can be quite delicate. So I took what I liked about both and figured I'd combine them to create my own canvas panels using rolled canvas mounted to hardboard panel.
The canvas I buy is fine textured and pre-primed with a layer of gesso. I prefer to mount them to Ampersand hardbord. After I’ve mounted canvas to the board, I’ll apply another layer of white gesso to reduce the texture down to the consistency of sandpaper. Adding additional layers of gesso makes the canvas more absorbent, which can create some issues for your first layer or two of paint, so be aware of that when applying your own primer layer.
You might need to experiment at this stage. What I'll do to help with this issue is add some titanium white acrylic paint mixed with burnt sienna into the gesso to help tone the canvas as well as reduce the absorbency overall. This helps greatly with keeping the paint handling like normal during that initial stage of the painting. If you’re curious about how I make my canvases, you can check out that video here!
So honestly, that's pretty much it when it boils down to it. How well a surface handles for your given techniques and how long it will last is what you should mainly be concerned with.
DO you ever PREFER STRETCHED CANVAS over PANEL?
If I am painting a very large piece, over 48" in length lets say, I would prefer stretched canvas. Board can get very heavy when its cut that large and not to mention you can't move it easily. The major advantage stretched canvas has over board is that it can be removed from the stretching bars and rolled up so that it can fit through doors and transported more easily.
If you like the feel and look of stretched canvas or are working on something large, just be sure that you go with a brand or type that is well constructed with back braces to keep it from warping. Some also come with wedges in the corners of the frame which can be used to maintain the tight pressure which is great. A few brands that I recommend are Masterpiece Pro, Fredrix Red Label, or Masterpiece Elite which is a smooth linen canvas (a bit pricier).
With hardboards and wooden painting panels, the same holds true. If you buy cheap panels, you're likely going to get something more fragile and not as archival overall. Additionally, some can be too rigid and snap far too easily when stressed. I always recommend Ampersand products when suggesting pro-quality boards. Then as far as the rolled canvas goes, it's definitely not as easy to go wrong, but I would always suggest quality over value to some degree. There are a lot of great choices and I think you get what you pay for. There are pre-made canvas panels as well, but I have never had luck finding one I truly trust and enjoy.
For those of you looking to simply paint for fun or a hobby, and would like to have quality WITHOUT breaking the bank, I would suggest something on the lines of these: Blick Premier, Winsor & Newton, Ampersand Gessobord or Blick Economy Canvas Panels.
SUPPLIES
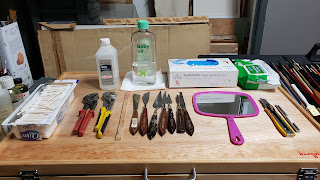
Qtips (to clean small areas on your palette and painting), paper towels, phone book(to clean your brushes), sharpened chopstick (to create texture, add small highlights etc), clove oil ( to add a few drops on cotton rounds and place them on your palette next to your paint, it slows the drying time), gloves, small plastic containers to cover paints, velcrox, palette knifes, disposable palette, hand held mirror (to see the reverse view on your painting), malhstick, air filter by Austin air as shown in pics.
BRUSHES
You need a few filberts: N2, N4, N6, N8, N10, N12, a few round sables: N00, N00, N0, N1, N2, N3, N4, N5, N6, N8, a few flat sables: N2, N4, N6, N8, N10, a few bristle flat brushes 1 inches, 2 inches, a few brights, a few bristle fan brushes.
I like Rosemary Brushes they are the best, and they are very affordable.
PALETTE
🎨
I use a Glass Palette, underneath of it, I place a medium tone buff paper, to give me a middle tone, I clean it with safflower oil and papertowels, if I need to I also use denatured alcohol and papertowel, as you see in the photo of my palette I also keep a few Pennies it also helps to keep the paint wet a little longer.
TAKING A BREAK FROM PAINTING
Cover your PALETTE I use a large underbed plastic container and I cover my whole glass pallete ( glass pallete is best it is easy to clean make sure you put underneath the glass brown or Midtone gray paper taped down that way you create a middle value surface to work) with which is 24 by 36 inches , and I can use some of the paint for the next day and sometimes the third day and then when it's time to clean, it cleans very easily.
ADDITIONAL SUPPLIES
these are some of the supplies that I highly recommend to paint with Oils🎨✍🏻 From left to right: Qtips for cleaning small areas in your palette, and to wipe clean small areas on your painting, 2 sets of plyers to unscrew the caps of some of your oil paints, a wooden mixing painting stick, I use it to mix my oil primer and for mixing the paint for staining the canvas, a sharpened chopstick stick, i use it to make texture on my painting, or to erase small areas, palette knifes some are for painting and some are made to mix paint, the mirror is good to get a reverse look on you work, vinyl gloves are the best to protect your skin, and wet wipes to clean your hands, Baby Oil I use to clean my brushes and glass palette, 99% alcohol I use to clean my glass 🎨 palette. On the 2nd pic, I have my kitchen stainless steel restaurant tray, add 1 part Safflower Oil+1 part Baby Oil, which I use to lay my brushes flat, next to it, I keep 2 metal containers one has safflower oil, and the other container has baby oil, I use them to clean my brushes, and lastly on the 3rd pic, I keep lids and plastic trays of different sizes to cover my paint or to use as a paint mixing tray.


HOW TO MIX YOUR OWN BURNT UMBER Equivalent to avoid ‘SINKING IN’
BURNT UMBER PROS
Because it is affordable and fast drying Burnt Umber can be a great choice for underpaintings in The Bistre method where the entire composition is mapped out in an earth toned underpainting and shaded so it essentially looks like an old sepia photograph.
Burnt Umber is a wonderful pigment. It dries fast, is affordable and incredibly useful for darkening colour mixes. Mixed with Ultramarine Blue it creates a black that can be easily adjusted to a cooler or warmer tone by adding more of one or the other pigment.
BURNT UMBER CONS
Burnt Umber can ‘sink in’ to the canvas making areas in the painting where it is present look flat and dull while neighbouring colours look rich.
Sinking in can be remedied with the final protective layer of varnish which will bring consistency to the whole painting. However there are still the following considerations:
As areas with Burnt Umber look duller and not as rich and dark as they will be once varnished it is difficult to colour match properly. To colour match these sunken areas they need to be ‘oiled out’ and wiped with a drying oil like linseed oil. Adding oil to sunken areas makes the colours look dark and rich and closer to what they will look like once the painting is varnished. The strongest part of the paint is the ground pigment itself, not the binding oil (the oil is also the component that’s susceptible to yellowing over time not the lightfast pigment) so artists who care about the longevity of their work may prefer to avoid adding additional medium such as Linseed or walnut oil as much as possible.
Photographs of the work may be required before varnishing is possible for marketing purposes etc which means the colours will not look how you intend. If varnishing is not done within 6 months when the painting is fully cured this may mean a long waiting period before it is possible to get images of the work that accurately show the colours.
Sometimes varnishing doesn’t produce the flawless consistency we hope for which may require us to remove the varnish, oil out sunken in areas and attempt again.
Depending on your style the above may not bother you and it may not be a problem for every project.
FORMULAS FOR MIXING BURNT UMBER
If you find the colour of Burnt Umber a useful pigment for mixing colours a ‘Burnt Umber’ equivalent can be mixed with the following combinations. (Note that while the purpose is to approximate the colour different pigments have different drying times and will differ to Burnt Umbers fast drying time):
HOW TO MAKE A BURNT UMBER OIL COLOR
1. French Ultramarine Blue + Cadmium Orange (Opaque option)
2. Burnt Sienna + Bone Black (aka Ivory Black) (Semi Transparent option)
3.Transparent Oxide Red + small amount of Phthalocyanine Green - (Transparent option - good for glazing)
4. Mars Yellow + Mars Red (or 'Venetian Red) + Bone Black (Semi - Opaque option)
5. Mars Yellow + Mars Red (or 'Venetian Red) + Mars Black (Opaque option)
HOW TO PAINT WITH OIL PAINTS WITHOUT USING THINNERS, PUTTY TUTORIAL, by Tad Spurgeon
Solvent-free painting in a variety of styles can be done simply using the putty medium. Putty can be simple or more complex in terms of its ingredients. The simplest putty is chalk or marble dust and oil, mixed together to a consistency that works for the painter's style. This pigmentless, full-bodied paint is then mixed into the paint before painting.

Chalk with oil added.

Beginning to mix. The chalk is not gritty, and absorbs oil readily.

A more mobile consistency. This will still make the paint itself more adhesive.

A firmer consistency. This will give more of an opportunity for stable impasto.
 A step-by-step tutorial follows about making a more complex putty from beginning to end.
Putty is principally made from stone dust and oil, a few other ingredients come into play in small amounts. The oil in tube paint is raw and makes a relatively weak paint film. The putty oil is therefore engineered to be stronger by using no raw oil. However, thicker or prepolymerized oils need to be used with care in more traditional styles of realism -- at about 5 to 10 percent of the total oil amount -- as they can easily create a paint which is over-saturated and difficult to manipulate. Illustrated here are a variety of oils that might be used in very small amounts. From left: Allback boiled linseed oil, aged a year in the light, a mixture of leaded walnut oils, all also pre-heated, Burnt Plate Oil #7, another pre-heated leaded walnut oil, a pre-heated walnut oil. More information about the oil can be found here.

First step, the oil is mixed into the bowl. In this case, I'm replicating a putty recipe that worked out well with a few small changes. The oil can be all thin, in this case the putty will dry matte. Adding small amounts of pre-polymerized oil -- such as sun oil, stand oil, Burnt Plate Oil -- will give the putty more saturation. These seem to work best at about 5 to 10 percent of the total oil. Burnt Plate Oil especially needs to be used in small amounts if control and relatively normal paint handling -- and drying -- are important. All of these factors of course depend on the look the painter wants. Because the putty is inherently stable, its parameters can -- especially on panels -- be pushed much further than other mediums without any technical issues occurring.

Next, the egg is broken and separated. The white gets beaten a little, but not enough to make glair. The yolk is reserved in this case, although putty can be made with egg yolk for use on panels. This paint has a soft saturation similar to tempera grassa if egg yolk is added as 5 to 10 percent of the putty.

The egg white is added to the oil. Egg white creates a seizing of the putty which requires more oil, resulting in a putty with more movement. This putty will be used on panels, for use on canvas it would be best to use egg white in smaller amount, at about 5 percent of the liquid totals. Egg is, in any case, optional. Without egg, the putty is more adhesive and tends to make low impasto or none at all.

The egg white is mixed thoroughly into the oil. It can form a loose emulsion, as here.

Various forms of stone dust can be used in putty, but the principle one is calcium carbonate. The various forms of calcium carbonate all perform a little differently. Chalk is more absorbent, the crystalline forms such as marble dust or calcite less so. Fine chalk is quite glutinous, coarser chalk more mobile. In practice none of these differences matter that much -- they all work, they all stabilize and buffer the paint -- unless you need a certain degree of fineness for the style. For very fine work this can be important. This particular putty is being made with 1/3 cup each of Kremer Calcite, Graphic Chemical French Chalk, and a fine Omya marble dust.

Dry ingredients added to wet. It's always a good idea to wear a particle mask for this.

Beginning to incorporate dry ingredients.

It looked a little wet so I added more calcite. Unless using a quality scale, putty is a relatively inexact science, but one learns more about what various rheologies will do on the palette from experience.

How tight or loose you make the putty depends on how you work and the specific combination of ingredients. I make it on the loose side when it's going in a tube, because it sets up a bit with age. On panels putty can be applied like mortar, but for canvas it can simply be used as an extender and strengthener of smooth paint.

One final ingredient, a tablespoon of bentonite. This complex clay is never very light but even a small amount will make a putty more springy or boingy.

Putting the putty into a large tube. This is not necessary, but ensures long shelf life for a recipe that you like. I'd also recommend working with the putty more informally for a while as just chalk and oil before tubing it, you can cover more conceptual territory quickly this way.

The final product, ready to extend and strengthen tube paint. Recipe in this case is: 7T pre-heated and/or leaded oil, 1egg white, 1 cup assorted calcium carbonate, 1 T bentonite. About half the amount of egg white would be preferable on stretched canvas.
Putty recipes tend to continue to evolve with experience, as the paint suggests different ways it might be configured. The recipe track may slow down getting to know the material, however. It may be helpful to work with a simple wet-dry mix of chalk and oil on the palette for a time before making up a particular or more complicated formula.

One of the things that has been intriguing about working with the chalk putty has been learning more over time about what it can do rheologically when used with hand-refined oil. Here's a look at a simple set of ingredients and what they can do.

The oil is salt-refined linseed oil that has been thickened in an open glass tray. It's not that thick, but will dry to a gloss in a putty at this density, as opposed to raw oil, which dries matte. First the slightly thicker oil is added to the chalk.

The result is somewhat dense and gluey because of the thicker oil. Added to paint, this would be very broad working, hard to move with anything but bristle brushes or a knife.

The introduction of a small amount of bone ash, what's leftover when bones are calcined, one of the oldest materials mentioned in painting manuals.

When the bone ash is added, the rheology of the putty relaxes. It is still dense, but now it is mobile, makes fine string, could be used with fine brushes.

This mobility can also be reversed somewhat. When the salt-refined linseed oil gets quite thick, it becomes a powerful seizing agent for the putty in small amounts.

It does something similar here, but the addition of bone ash keeps the putty from becoming a near-solid. This has quite a balanced rheology now between density and movement, would be great fun for painterly realism. So, with very few ingredients, and no resins or solvents, it is possible to create a great many different working qualities for the paint. The key to this is the complexity of the rheologies set up by the salt refined oil, a technique that is at least four centuries old. Commercial oils such as stand oil or burnt plate oil induce the opposite behavior: melting and leveling, not thixotropy. Sun oil is a little better, but commercial sun oil is never refined, and this makes it less likely to cause seizing. The system is non-Newtonian on two levels: the solid bone ash makes the putty thinner, and the addition of a liquid oil makes it thicker. This technique may or may not be related to older methods, but all its ingredients have been available for centuries. The bone ash, of course, is not critical, since the putty can always be loosened with thinner oil, but it does introduce a quality of its own. So, when we read about an older painting being made with "chalk, pigment, and oil," the situation may be a little more complex than those words indicate. More importantly, the system is versatile, stable, and a great deal of fun to explore.
This oil cannot be purchased, and I shudder to think what our dear friends who manufacture art materials would charge for a high quality oil they actually had to process. But, flitting lightly over that, if you are interested in making this oil, you can download an updated PDF of the procedure here. This text now includes three other traditional refining methods in addition to the one exampled here.

The putty changes color behavior. Here are samples of terra rosa, green earth, and ultramarine blue.

The samples above cut progressively with putty. While these colors are lighter, they have significantly more chroma than a similar value made with white. If this is making the hairs on the back of your neck stand on end, thank you. The putty brightens the colors, and gives them a lighter, more aerated quality. Using the putty allows a great deal more apparent color to come from a simple earth color palette by sequestering the use of white to specific areas of the painting. This was of course the foundation of many different 17th Century techniques.

The putty medium can be configured in many ways. It will make paint which is thin and smooth as well as paint which is rough and broken. It acts both physically and chemically to stabilize the paint film.This is an extremely versatile and tough material.
I hope you liked what i wrote, please follow me on my social media below, I also teach, and if you have any questions feel free to contact me :) thank you.
Paul Torres
